FEBRUARY 11 2025
Announcing Dgraph support for Google's Gen AI Toolbox for Databases
Connect your production-grade AI apps to Dgraph easier than ever before
More than ever before, dev teams are infusing their AI solutions with a strong data foundation. That approach requires new tools, frameworks, and connections with various data sources.
We're excited to announce Dgraph support for Google's Gen AI Toolbox for databases, empowering developers to connect production-grade, agent-based Gen AI apps to their Dgraph graph database.
A quick introduction to Dgraph
Dgraph is the fully open source, built-for-scale graph database for today's AI apps. It's designed for real-time workloads, horizontal scalability, and data flexibility. Implemented as a distributed system, Dgraph processes queries in parallel to deliver real-time results, even for the most complex workloads.
Dgraph is the graph database for building and hosting knowledge graphs, which are the foundation of today's AI solutions. What sets Dgraph apart is its AI-native primitives. Dgraph's vector indexing, search, and storage allow you to store multiple embeddings on any given node.
Uniquely able to store multiple vector embeddings, Dgraph allows you to compare and combine embedding models to get the best results for your similarity search. You can combine Hierarchical Navigable Small World (HNSW) vector similarity, keyword search, geospatial polygons, and graph traversals to power your multi-modal search. In addition, Dgraph's multi-tenancy capabilities enable your AI apps to have logically separated knowledge graphs.
Introducing Gen AI Toolbox for databases by Google
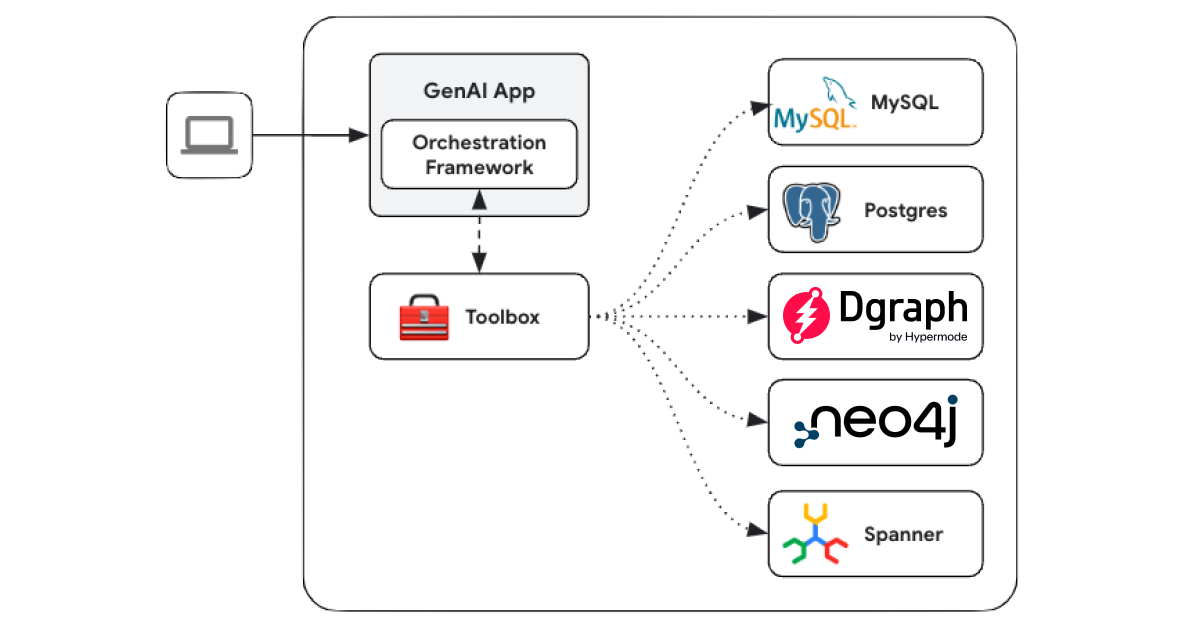
Gen AI Toolbox for databases is an open source server that streamlines the creation, deployment, and management of sophisticated Gen AI tools capable of querying databases with secure access, robust observability, scalability, and comprehensive manageability. Toolbox serves as an intermediary between the app's orchestration layer and data sources/databases, simplifying database operations through intelligent tooling and automation.
For Dgraph users, this integration is particularly valuable as a native data source within Toolbox.
Integration benefits
The integration between Dgraph and Toolbox offers app developers better manageability, simplified development workflows, and enhanced tooling for operations. Some of the benefits include:
-
Simplified configuration: Setting up the integration is straightforward: simply configure
kind: dgraphin the source andkind: dgraph-dqlin Toolbox. A tool represents an action your agent can take, such as running a DQL query. -
Automated management: Toolbox handles critical operational tasks such as connection pooling, authentication, and resource management. A config-driven approach enables zero downtime deployment.
-
Security and observability: Organizations get built-in support for common auth providers and out-of-the-box insights via logging, metrics, and tracing.
In the rest of this blog post, I'll explain how to leverage these tools together, showing you how to mutate and query data in Dgraph using the YAML configuration and Python script.
Prerequisites
To use Dgraph with Toolbox, you'll need to do the following:
-
Clone the repository. Use the following command to clone the toolbox repository:
git clone https://github.com/googleapis/genai-toolbox.git -
Ensure you have the Dgraph backend URL, API key (if using Dgraph Cloud), and ACL credentials (if applicable) ready before proceeding.
When connecting to a hosted Dgraph database, this source uses the API key for access. If you are using a dedicated environment, you additionally need the namespace and user credentials for that namespace.
For connecting to a local or self-hosted Dgraph database, use the namespace and user credentials for that namespace.
Dgraph backend URL:
- In a cloud environment, this is your cloud instance URL (for example,
https://dgraph.ap.south.xxxx.dgraph.io). - For local clusters, use the Alpha server address (for example,
http://localhost:8080).
- In a cloud environment, this is your cloud instance URL (for example,
-
Build the project locally Navigate to the cloned repository and build the project using the following command:
go build .To use Dgraph as a source, you need to have at least a Dgraph Cloud backend or a local Dgraph cluster. Create one here if you need one.
Configuring sources & tools
Now that we've set up the project, let's define the source and tools for interacting with the Dgraph database.
Before we dive into the YAML configuration, let's briefly explain the key components:
- Source: The
sourcedefines the connection to the Dgraph database. It includes details like the Dgraph backend URL and API key (for cloud environments). This serves as the foundation for all tools that interact with the database. - Tool: A
tooldefines a specific operation your app can perform, such as executing a DQL query or applying a mutation. Each tool is associated with a source and includes:- Dynamic parameters to accept user inputs for flexibility.
- A DQL statement to define the query or mutation logic.
- Metadata such as descriptions and timeouts, to provide context and control execution.
YAML configuration
# Define the source that connects to the Dgraph database.
sources:
  dgraph-manage-user-instance:
    kind: "dgraph"  # Specifies the type of source (Dgraph in this case).
    dgraphUrl: "https://xxxx.ap-south-1.aws.cloud.dgraph.io"  # URL of the Dgraph backend.
    apiKey: "api-key"  # API key required for authentication (used in cloud environments).

# Define tools that interact with the Dgraph database.
tools:
  add_user:
    kind: dgraph-dql  # Specifies the tool type (Dgraph DQL for mutations/queries).
    source: dgraph-manage-user-instance  # Links the tool to the defined source.
    isQuery: false  # Indicates this is a mutation operation.
    statement: |  # The DQL mutation statement to insert or update user data.
      {
        set {
          _:user1 <name> $user1 .
          _:user1 <email> $email1 .
          _:user1 <role> "admin" .
          _:user1 <age> "35" .
          _:user2 <name> $user2 .
          _:user2 <email> $email2 .
          _:user2 <role> "admin" .
          _:user2 <age> "45" .
        }
      }
    description: |  # A brief description of what this tool does.
      Use this tool to insert or update user data into the Dgraph database.
      The mutation adds or updates user details like name, email, role, and age.
      Example: Add users Alice and Bob as admins with specific ages.
    parameters:  # Defines dynamic parameters for the tool.
      - name: user1
        type: string
        description: Name of the first user (e.g., Alice)
      - name: email1
        type: string
        description: Email of the first user (e.g., alice@email.com)
      - name: user2
        type: string
        description: Name of the second user (e.g., Bob)
      - name: email2
        type: string
        description: Email of the second user (e.g., bob@email.com)

  search_user:
    kind: dgraph-dql  # Specifies the tool type (Dgraph DQL for mutations/queries).
    source: dgraph-manage-user-instance  # Links the tool to the defined source.
    isQuery: true  # Indicates this is a query operation.
    timeout: 20s  # Sets a timeout for the operation to avoid hanging indefinitely.
    statement: |  # The DQL query statement to retrieve user data.
      query all($role: string) {
        users(func: has(name)) @filter(eq(role, $role) AND ge(age, 30) AND le(age, 50)) {
          uid
          name
          email
          role
          age
        }
      }
    description: |  # A brief description of what this tool does.
      Use this tool to query user data from the Dgraph database.
      This query retrieves users with a specific role and age range (30–50).
      Example: Find all admin users aged between 30 and 50.
    parameters:  # Defines dynamic parameters for the tool.
      - name: role
        type: string
        description: Role to filter users by (e.g., admin)
Invoking tools using python
Now that we've configured the source and tools in YAML, let's see how to invoke
these tools programmatically using Python. Below is a script that demonstrates
how to use the Toolbox LangChain SDK to interact with the add_user and
search_user tools.
from toolbox_langchain_sdk import ToolboxClient
import asyncio

async def main():
    # Update the URL to point to your server
    client = ToolboxClient("http://127.0.0.1:5000")
    add_user_tool = await client.load_tool("add_user")
    result = await add_user_tool.ainvoke({"user1":"Alice","user2":"Bob","email1":"alice@email.com","email2":"bob@email.com"})
    print(result)

    search_user_tool = await client.load_tool("search_user")
    result = await search_user_tool.ainvoke({"role":"admin"})
    print(result)

if __name__ == "__main__":
    asyncio.run(main())
How it works
- Toolbox client initialization
- The
ToolboxClientis initialized with the URL of your Toolbox server (for example,http://127.0.0.1:5000). - Ensure the Toolbox server is running and accessible at this address.
- The
- Loading tools
- The
load_toolmethod dynamically loads the tools (add_userandsearch_user) defined in the YAML configuration. - Each tool corresponds to a specific operation (mutation or query) on your Dgraph database.
- The
- Invoking tools
- The
ainvokemethod is used to execute the tools with the required parameters.- For
add_user, we pass user details (user1,user2,email1,email2) as inputs. - For
search_user, we pass theroleparameter to filter users by their role.
- For
- The
- Output
- The results of each invocation are printed to the console.
- For
add_user, the output confirms whether the mutation was successful. - For
search_user, the output contains the queried data, such as usernames, emails, roles, and ages.
Running the script
To run the script, follow these steps:
- Ensure the Toolbox server is running locally or update the URL in the script to point to your server.
- Save the script to a file (for example,
invoke_tools.py). - Run the script using Python:
python invoke_tools.pyExpected output
When you run the script, you should see output similar to the following:
{
    'result': 'Stub tool call for "add_user"! Parameters parsed: map["$email1":"alice@email.com" "$email2":"bob@email.com" "$user1":"Alice" "$user2":"Bob"] \n Output: map[code:Success message:Done queries:<nil> uids:map[user1:0x9be961549a user2:0x9be961549b]]'
}

{
    'result': 'Stub tool call for "search_user"! Parameters parsed: map["$role":"admin"]Output: map[users:[map[age:35 email:alice@email.com name:Alice role:admin uid:0x9be9604f12] map[age:45 email:bob@email.com name:Bob role:admin uid:0x9be9604f13] map[age:35 email:alice@email.com name:Alice role:admin uid:0x9be9615498] map[age:45 email:bob@email.com name:Bob role:admin uid:0x9be9615499] map[age:35 email:alice@email.com name:Alice role:admin uid:0x9be961549a] map[age:45 email:bob@email.com name:Bob role:admin uid:0x9be961549b]]]'
}
Conclusion
We're excited about the new possibilities that Dgraph support in Gen AI Toolbox for databases unlocks for you and your team. This new release helps you even more smoothly connect your AI apps and solutions to your Dgraph graph database.
Here are some further resources to get you started:
We're excited to see what you build.
Ready to get started with the ultimate graph database for building and hosting knowledge graphs? Try out Dgraph Cloud today and start building AI-native apps of tomorrow.